Pages
Tuesday, May 31, 2011
How to Install a Floor…..Laundry Room Re-do
Hey guys!!
My floor in my laundry room is all complete and I’m going to show you how I did it.
First let me say that I used peel and stick and it worked like a dream and the whole floor only cost me $65.00! I will say, that it works best if it’s used in rooms without tons of curves or pipes to cut around, because it’s difficult to cut in anyway other than straight. It worked great in my laundry room though…everything except for where the dryer lint duct went into the floor, was square and I was able to cut around that without incident!
So lets get started.
Before I did anything, I made sure my old floor wasn’t loose anywhere and then I scrubbed the dickens out of that old thing to make sure the new floor would stick appropriately. Make sure to let your old floor dry thoroughly before laying down the peel n stick.
I used 12” x 12” tiles, so I measured out 12” from the wall across from my door and snapped a chalk line. This is a chalk line tool…
To use a chalk line, just hold one end of the line at one measured point and the other end at another measured off point…hold it tight and snap it in the middle. (you could always just use a pen to draw a line if you don’t want to mess with the chalk line.) It will look like this……..
Next you measure the width of your room and divide it in half..that will be where you snap your next line. See, it makes a T on the floor when you get the 2nd line snapped…. (and yes, those are my tootsies…they could use a pedicure) lol
This picture shows it a little closer so you can see what I mean by the T….
At this point, I dry fit my tiles (that means I don’t stick them down yet…just checking on fit) on the floor to make sure everything was going to fit right and the tiles were nice and straight. You lay them out on the far edge of the line you snapped 12” from the wall, then start down the center line where the T was to check your fit.
If you look over by the dryer duct, you’ll see I’m going to have to cut the side pieces to fit…I just made sure that both sides were going to be about the same width cuts.
This is the tile I chose…it’s called Ebony and I got it from Lowes. Basically it’s a super shiny, black marble-y looking tile and it went down easy! (sorry about the blurry pic…you’d think I could take a decent picture by now!) lol
I just started laying the tiles by peeling off the back paper and laying them down on that first chalk line and starting down the middle T. I laid out all the pieces, just butting the edges up to one another, making sure I kept all the seams tight….
I just kept laying them out until I ran out of places to use full tiles. As you can seem by this pic, I still had some more full tiles to lay, but it was getting there!
Once I finished all the full tiles, it was time to tackle the edges. This is the easiest way I found to do the edges. Lay the piece you’re going to need, face down and pushed up against the wall like this…. (the beveled edge that you will butt up against the other tile, is against the wall at this point)
Take a straight edge, (I used a piece of wood left over from my board and batten project) and line it up with the flooring pieces on either side…..and draw a line…..
Carefully cut on the line. You’ll need to put some serious pressure on the knife to get a deep cut. Then you just bend the piece until it snaps where you cut it. (this raw edge, goes against the wall)
This is what it looks like once you peel it and put it in place. (see the beveled edge that was against the wall when marking, is now butted up against the other tile) It gives you an amazingly close edge…I didn’t even use quarter round around the edge of this floor because the cuts fit so tight!
I continued cutting the edge pieces all the way around the room until it was finished! I will say that the piece around the corner of the ugly furnace was a bit tricky and I had to cut it a couple of times to get it right, but that was really the only hard piece on the whole floor! (oh and I have a solution to show you later for hiding that furnace!!)
Once your floor is all laid out, they say to use 100lb roller to go over, but since I weigh more than that, I just walked over all the floor, making sure to really bounce on all the edges.
There ya have it, a brand new shiny floor, for $65.00 and a little elbow grease! Can’t beat it!
Stay tuned for more laundry room makeover fun!
Next I’ll be showing you what I did with the floor space underneath these cabinets!
And if you missed any of the laundry room re-do so far, you can go here, here and here, to catch up!
So stay tuned!
Hugs
Missy
Thursday, May 26, 2011
Treasures and Trinkets Linky Party!!
Good morning my lovely peeps! It’s time for my weekly link up party! Link up your treasures or trinket for the week…it can be anything you love, a project you’re doing and so forth.
This is my treasure for the week…my beautiful fairy rose. We had this type of rose growing on the fence when I was a little girl, so every time I see it blooming, I think of the house I grew up in on Finnel Pike. The fence this rose grew on was down a little embankment in our front yard, and I would ride my bike around the house and, more times than not, run into that fence. I had more than one up close and personal meeting with that rose bush! It’s funny the things you remember most about the places you were raised.
So, two things today….What do you remember most about where you grew up and link up something to Treasures and Trinkets!
OH and one more thing, have a beautiful day!
Hugs
Missy
Friday, May 20, 2011
Laundry Room Part THREE!
Hey Ya’ll!!
I’m SO excited to get to this post because my laundry room is starting to look SO different! (and it’s definitely in a good way!)
Remember my last post where I showed you these?? (please ignore my messy garage….it’ll get cleaned out when it ever decides to get warm around here!)
There’s two of the cabinets…and they sure don’t look like THAT anymore!
I bought them at our local Habitat for Humanity restore for $25.00 each. Not too bad because they’re solid wood. (not particle board like so many of the cabinets you see today!)
Anyway……I started the process of revamping the cabinets by sanding the bejeebers out of them with my trusty Black and Decker sander! It cut all the old gunk off, plus gave my cabinets some “tooth” so the primer would grip and not scratch off later. (and no they didn’t give me a sander for saying that..I just really love my black and decker tools!)
This is my priming area…yep, the laundry room floor…doesn’t matter if I get paint on it or not, cause I’m changing it out very soon! (and yes, I’ll show you how to lay your own floor!)
I used Kilz 2 as my primer…it’s nice and thick and covers like a dream! I also discovered how much I LOVE these little tiny rollers…I’ll never go back to those fat ones again! These don’t splatter and they give such a nice smooth finish!
Here are the cabinets after a couple of coats of primer……
I thought the shape of the doors were cute and love that they have the look of beadboard inside them!
After I primed, I painted the cabinets with a couple of coats of Olympic Premium Semi-gloss in a bright white.
Then I started the installation of the cabinets on the wall. (after the paint had dried for a day or two of course!). I determined where I wanted my cabinets to hang and screwed them into the wall into studs. My son, Lincoln, held the cabinets up while I screwed them to the wall. That was the only help I had in this whole room! Yay me! (if any of you have kids, you might remember the Suite life of Zack and Cody on Disney..well that was my impression of London Tipton!)
After getting the cabinets up, I started adding my board and batten on this side too…..
Man oh man, did I ever luck out and hit studs on every single piece of wood.. (that will never happen again in a million years!) Like I said before though, you can always use a construction adhesive if you’re not blessed enough to hit studs in your room.
Here the board and batten is all up and given a couple of coats of the same bright white paint as the cabinets. (I made sure the two pieces of board and batten in the center were equal distance from the cabinets…I fudged the numbers everywhere else, so those two pieces could be centered.
Ok..see this little bag….
It holds these little braces. They are actually meant for chairs to help make them sturdy, but they make the best little brackets for shelves if you’re able to put them up on three sides…..
See, I installed the brackets on the walls and also on the sides of the cabinets to hold up my shelf….
Here’s one shelf all installed. OH, before I forget to tell you, this shelf was installed on top of the board and batten board, so I made the next shelf that goes above it a little wider so they would stick out the same amount.
Here are both shelves installed……….
In this picture I am showing you that I made the shelves sit back from the front edge of the cabinets a little so I would have room to add some nice trim to trim out the front edge of the shelves. I always try to plan out my whole project on paper and think of these kinds of things before I start cutting, it’s so much easier to plan ahead than to fix something later!
Here is my trim work all put in place…I actually used Loctite to install this so I wouldn’t have any nail holes showing…..
OK…that is where we stand today! I’ll be installing the doors and floors next, so stay tuned!
Have a great day!
Missy
Wednesday, May 18, 2011
Treasures and Trinkets Linky Time!
Can I be honest with you guys? I’ve had a terrible week..everyone in our house has been sick and actually they’re still sick, so I’m not feeling much like partying today. I also know I’m posting this early, but I have to do it while I feel like it.
So as funny as it may be, this is my Treasure for the week….
I know, I’m usually all upbeat and happy, but between all this sickness and the horrible weather in KY, I’m kinda bummed.……does anyone know exactly how long it can rain in one place before they’re considered part of the rain forest? LOL
Seriously..I don’t remember the last time it’s rained for so long and now it’s cold to boot. We’re supposed to be in the 70’s and it’s been in the 40’s and 50’s….goodness I need sun and warmer temps!
Ok…I need you guys to give me some pretty things to look at while lying in this bed!
Link up your goodies so I’ll have something to do while recovering from this creeping crud I have going on!
Hope you all have a wonderful “rest of the week”!~
Missy
Friday, May 13, 2011
Laundry Room
Laundry Room Makeover Part 2…
This is where we left off in my last post…..a single board on the wall!
I asked if anyone had a guess as to what I was doing with that piece of wood on the wall, and Patti from Crystal Rose Cottage and Deborah from Fairfield House, guessed a wainscoting of some type …and they were right! I’m doing board and batten in here!
I started out with the top piece. I made sure it was nice and level with my handy dandy level! I actually put it up and took it down because it looked crooked. Come to find out my ceiling has a slight uphill slant so it was level after all……..I re-installed it. LOL
I put the top piece at 66” high because it just “felt” right and I also wanted to make sure I missed any light switches and laundry room hoses etc.
I started with my vertical boards next…this required a little math. I determined I wanted my boards about 12” apart, so I took the width of my wall (79”) and subtracted the width of each board (times the number of boards I was going to use on that wall, which was 4) from that length, which was 10” (width of 4 boards) and it left 69”. Then I determined that putting up four boards would leave five spaces between them, so I divided the 69” by 5 and it came out to be about 13 1/2” between each board. BUT, if math isn’t your thing, you could just tape the boards up and see where you like the spacing and adjust that way. (probably easier than math!)
I used my level to make sure the vertical boards were level as well.
I taped up some of the boards to make sure they were spaced the way I wanted them visually…yep, they looked good!
I started to nail. OH, before I finalized my spacing, I used a stud finder to find all the studs in my walls and it happened that the way I wanted them spaced, they were going to hit a stud every time! Now this is highly unusual, so if you don’t hit studs, you can use a tube of Loctite or liquid nail adhesive.
I actually used Loctite on the walls where there was 220 electrical outlets and water pipes…sure didn’t want to nail into either of those! NEVER nail into walls with high voltage electricity or water pipes..you’re just asking for trouble!
This is what Loctite looks like and how you should apply it…..squiggly lines down you boards. You apply it with a caulking gun.
This is what I did to keep the boards up while the adhesive was drying….. good old fashion taped!
So this is where I am… board and batten on three walls.
Wanna know what’s going on the fourth wall??
Stay tuned to my next post, I’ll be showing you what I’ll be doing with these…. (there’s two of them) Don’t be scared, they won’t stay this way…you know what I do to old cabinets! Oh, if you’re new to my blog and don’t know what I do with old cabinets..you can go HERE!
I CAN’T wait to show you how this is turning out!!
Have a great day!
Missy
Sunday, May 8, 2011
Beneath My Heart..Party Time!
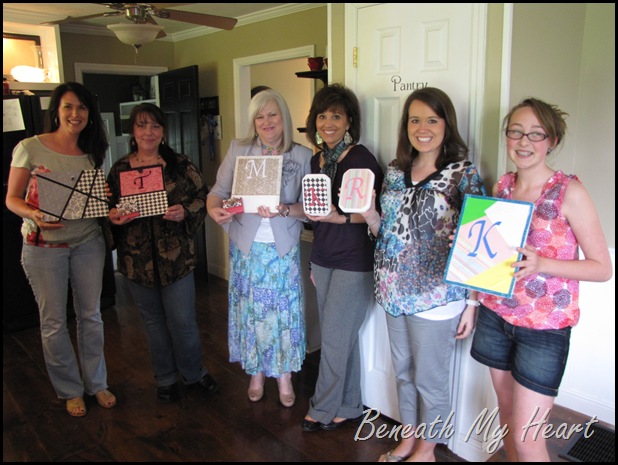
I just wanted to share with you all the fun I had at Traci’s house from Beneath My Heart!
She had an Elmer’s Craft and Tell Party and it was SO fun!
Here’s a pic of Me, Traci (Beneath My Heart), and Gail (another KY blogger…Gleanings From Gail)…what precious ladies!
We met at her house on a Sunday afternoon for the party, there was a great group of ladies there….
From left..Ande (Traci’s sweet sister in law), Courtney, her beautiful niece, Cyndi (Traci’s sister who also has a blog..Walking in His Grace), Me, Gail (Gleanings From Gail) and the sweet young lady on the end is Traci’s niece Kinsey! (and Traci was taking the picture!)
We all had a wonderful time and pigged out on these amazing cupcakes from The Yellow House Cakery! I had a lemon one, but the other looked yummy too…it was a peanut butter cup cupcake.
Traci also had other goodies on hand…she was a wonderful hostess!
We all got to enjoy using Elmer’s Craft supplies to make some really fun items. Here’s a pic of all the ladies with the crafts they made for the day! I made a cute post it note holder and a magnet board to hold all my important papers.. i.e…grocery lists and phone numbers! LOL
This picture lets you see how very short I am (second one from the left)……her nieces are even taller than me…sigh.
Traci blogged about the whole party HERE and has some hilarious pictures of all of us with thought bubbles…you HAVE to go read it..she is SO funny!
What Traci didn’t blog about (because she’s so nice!) is that my car broke down in her drive way…oh gee! I’ve had that thing for nearly 4 years and NEVER had a problem with it until now! LOL Apparently my key and my computer weren’t talking and I had to have a new computer module installed. Traci was so gracious and took care of me till my my hubby and the tow truck arrived. :0) I was really ok with my car breaking down after Traci and I got to spend some real quality time talking. I feel so very blessed to know her in real life! I have read her blog for a long time, but getting to call her my real life friend is such a joy!
So thanks again Traci for the party, the munchies, the craft time, but mostly for allowing me to call you my friend…..I’m truly blessed to know you! (maybe you can come hang out in my driveway sometime soon! lol)
If you don’t know Traci you need to hop over to her blog and see how wonderfully talented and sweet she really is!
Hugs!
Missy